Xây dựng Mail server Postfix
Xây dựng Mail server Postfix
Trong thời gian làm việc ở Nhật, mình có tham gia dự án triển khai hệ thống Mail server cho công ty khách hàng. Từ đây mình mới tìm hiểu, thiết kế và triển khai. Qua quá trình này mình muốn chia sẻ lại những thông tin thực tế mà mình hiểu được khi triển khai.
Chuẩn bị
- EC2
- Elastic IP trust (Need request with AWS following: https://aws.amazon.com/forms/ec2-email-limit-rdns-request?catalog=true&isauthcode=true)
- Domain name (On Route53 or DNS server)
- PTR record for the IP address
- SPF record
- DKIM
- DMARC
PTR là gì
- PTR Record là viết tắt của Point Record còn được gọi là bản ghi ngược. Một bản ghi PTR thực hiện việc ánh xạ một địa chỉ IP đến một tên miền.
SPF là gì
- SPF (Khung chính sách người gửi) là một cơ chế để kiểm tra xem tên miền gửi email có bị giả mạo hay không. Thông số kỹ thuật SPF được xác định trong RFC4408
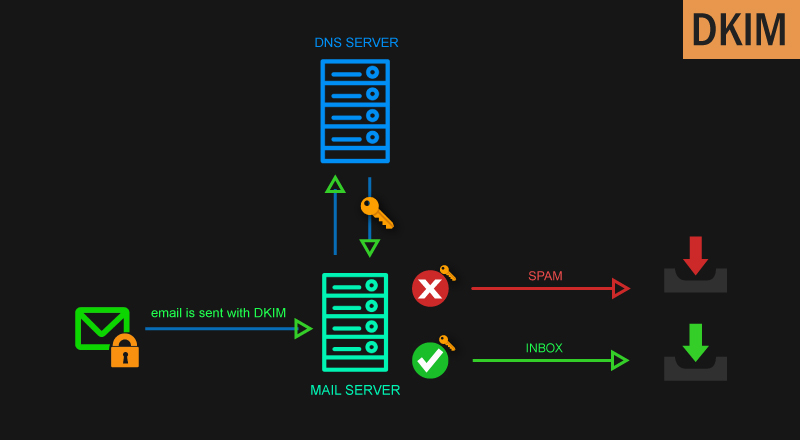
DKIM là gì
- DKIM (Thư xác định tên miền) là một trong những công nghệ xác thực tên miền gửi email. Khi gửi thư, người gửi thực hiện chữ ký điện tử và người nhận xác minh để người gửi có thể được mạo danh. Nó làm cho nó có thể phát hiện giả mạo email.
DMARC là gì
- DMARC is an email authentication protocol. It is designed to give email domain owners the ability to protect their domain from unauthorized use, commonly known as email spoofing. (Dịch tiếng việt hơi khó hiểu nên để nguyên bản English :D)
Chi tiết SPF, DKIM, DMARC xem tại đây
Thực hiện triển khai
-
Cài đặt Postfix
sudo yum install -y postfix -
Cài đặt Opendkim (Do dùng phiên bản Amazon linux AMI 2013 đã cũ nên cần cài Opendkim từ EPEL)
sudo yum install -y https://dl.fedoraproject.org/pub/epel/epel-release-latest-6.noarch.rpm sudo yum install -y epel-release sudo yum-config-manager --enable epel sudo yum install -y opendkim -
Tạo thư mục chứa key của dkim
sudo mkdir /etc/opendkim/keys/{domain} -
Tạo cặp khóa (Public/Private) trong folder mới tạo
sudo opendkim-genkey -D /etc/opendkim/keys/{domain} -d {domain} -s {keyname} -
Thay đổi chủ sở hữu của folder chứa key thành
opendkimsudo chown -R opendkim:opendkim /etc/opendkim/keys/{domain} -
Cấu hình Opendkim
sudo vi /etc/opendkim.conf Mode v ↓ Mode sv SoftwareHeader yes ↓ SoftwareHeader no KeyFile /etc/opendkim/keys/default.private ↓ #KeyFile /etc/opendkim/keys/default.private #KeyTable /etc/opendkim/KeyTable ↓ KeyTable refile:/etc/opendkim/KeyTable #SigningTable refile:/etc/opendkim/SigningTable ↓ SigningTable refile:/etc/opendkim/SigningTable #ExternalIgnoreList refile:/etc/opendkim/TrustedHosts ↓ ExternalIgnoreList refile:/etc/opendkim/TrustedHosts #InternalHosts refile:/etc/opendkim/TrustedHosts ↓ InternalHosts refile:/etc/opendkim/TrustedHosts -
Cập nhật lại KeyTable
vim /etc/opendkim/KeyTabe # OPENDKIM KEY TABLE # To use this file, uncomment the #KeyTable option in /etc/opendkim.conf, # then uncomment the following line and replace example.com with your domain # name, then restart OpenDKIM. Additional keys may be added on separate lines. {keyname}._domainkey.{domain} {domain}:{keyname}:/etc/opendkim/keys/{domain}/{keyname}.private -
Cập nhật lại SigningTable
  vim /etc/opendkim/SigningTable
  # WILDCARD EXAMPLE
  # Enables signing for any address on the listed domain(s), but will work only if
  # "refile:/etc/opendkim/SigningTable" is included in /etc/opendkim.conf.
  # Create additional lines for additional domains.
  *@{domain} {keyname}._domainkey.{domain}
Note: Nếu bạn muốn gửi thư từ bên thứ 3 thông qua domain của bạn mà vẫn được verify với domain của bạn, thì thêm domain của bên thứ 3 vào file SigningTable sử dụng key Dkim domain của bạn như sau:
```
vim /etc/opendkim/SigningTable
# WILDCARD EXAMPLE
# Enables signing for any address on the listed domain(s), but will work only if
# "refile:/etc/opendkim/SigningTable" is included in /etc/opendkim.conf.
# Create additional lines for additional domains.
*@{domain} {keyname}._domainkey.{domain}
*@{domain_customer} {keyname}._domainkey.{domain}
```
Hoặc cho phép tất cả domain của bên thứ 3 pass qua Dkim thì sửa như sau:
```
vim /etc/opendkim/SigningTable
# WILDCARD EXAMPLE
# Enables signing for any address on the listed domain(s), but will work only if
# "refile:/etc/opendkim/SigningTable" is included in /etc/opendkim.conf.
# Create additional lines for additional domains.
*@{domain} {keyname}._domainkey.{domain}
*@* {keyname}._domainkey.{domain}
```
-
Cập nhật lại TrustedHosts
  vim /etc/opendkim/TrustedHosts
  # OPENDKIM TRUSTED HOSTS
  # To use this file, uncomment the #ExternalIgnoreList and/or the #InternalHosts
  # option in /etc/opendkim.conf then restart OpenDKIM. Additional hosts
  # may be added on separate lines (IP addresses, hostnames, or CIDR ranges).
  # The localhost IP (127.0.0.1) should always be the first entry in this file.
  127.0.0.1
  ::1
  #host.example.com
  #192.168.1.0/24
  10.0.1.10 or 10.0.1.0/24
Note: TrustedHost sẽ cho phép IP nào được sử dụng Key DKIM. Cho nên cần add thêm IP or dải IP của server mail vào TrustedHost nếu muốn gửi mail từ server bên ngoài.
-
Cấu hình Postfix Thay đổi lại các chỉ số sau:
vim /etc/opendkim.conf PidFile /var/run/opendkim/opendkim.pid Mode sv Syslog yes SyslogSuccess yes LogWhy yes UserID opendkim:opendkim Socket inet:8891@localhost Umask 002 SendReports yes SoftwareHeader yes Canonicalization relaxed/relaxed Selector default MinimumKeyBits 1024 KeyTable refile:/etc/opendkim/KeyTable SigningTable refile:/etc/opendkim/SigningTable ExternalIgnoreList refile:/etc/opendkim/TrustedHosts InternalHosts refile:/etc/opendkim/TrustedHosts OversignHeaders From #smpt_auth smtpd_sasl_auth_enable = yes smtpd_sasl_local_domain = $myhostname smtpd_recipient_restrictions = permit_mynetworks permit_sasl_authenticated reject_unauth_destination message_size_limit = 10485760 disable_vrfy_command = yes ## smtp_helo_name smtp_helo_name = $myhostname.$mydomain allow_min_user = yes # Config DKIM smtpd_milters = inet:localhost:8891 non_smtpd_milters = inet:localhost:8891 milter_default_action = accept -
Khởi động lại Postfix và Opendkim
sudo service postfix restart sudo service opendkim restart
-
Thực hiện cấu hình SPF trên Route53
Thêm bản ghi: NAME: {domain} TYPE: TXT Alias: No TTL: 300 Value: "v=spf1 ip4:1.2.3.4 ~all" Routing Policy: Simple -
Thực hiện cấu hình DKIM trên Route53
Name: {keyname}._domainkey.{domain} Type: TXT - Text Alias: No TTL: 300 Value: {nội dung của {keyname}.txt} Routing Policy: Simple Name: _adsp._domainkey.{domain} Type: TXT - Text Alias: No TTL: 300 Value: "dkim=unknown" Routing Policy: Simple -
Thực hiện cấu hình DMARC trên route53
_dmarc.{domain}. TXT v=DMARC1; p=reject; pct=100; rua=mailto:dmarc-reports@{domain}; -
Thực hiện test SPF, DKIM, DMARC
dig {key_name}._domainkey.{domain} TXT dig _adsp._domainkey.{domain} TXT -
Thực hiện test gửi mail từ command:
  touch send_mail.txt
  cat > send_mail.txt <<EOF
  HELO tunglouis
  MAIL FROM: <no-reply-admin@{domain}>
  RCPT TO: <tungpv@gmail.com>
  DATA
  From: tungpv@louis.jp
  Subject: test mail no reply admin
  This is a Test mail from nc
  Hello test!
  .
  EOF
  cat send_mail.txt | nc localhost 25
  220 mail03-16 ESMTP unknown
  250 mail03-16
  250 2.1.0 Ok
  250 2.1.5 Ok
  354 End data with <CR><LF>.<CR><LF>
  250 2.0.0 Ok: queued as D191240A2F
Tất cả quá trình cài đặt postfix và dkim bạn có thể sử dụng scripts sau để thực hiện:
#!/bin/bash


if [[ "$1" != "INSTALL" ]]
then
echo "Note: please run from root user"
echo "This script will generate keys for domain and install openDkim postfix on this host"
echo "to process please use $0 INSTALL"
exit
fi

echo -n 'Enter Domain name : '
read domain_global

echo 'Specifies the selector, or name, of the key pair generated'
echo -n 'Enter group name/DNS (node|mail) : '
read group_name

echo Install opendkim

yum install -y postfix

echo Install EPEL
yum install -y https://dl.fedoraproject.org/pub/epel/epel-release-latest-6.noarch.rpm
yum install -y epel-release
yum-config-manager --enable epel

echo Install opendkim

yum install -y opendkim
mkdir -p /etc/opendkim/${domain_global} &>/dev/null

echo ______________________________________________________________________________________

echo "Generate key for ${domain_global}:${group_name}"
opendkim-genkey -D /etc/opendkim/keys/${domain_global} -d $domain_global -s $group_name

echo ______________________________________________________________________________________

echo 'Update keytable file'
echo "${group_name}._domainkey.${domain_global} ${domain_global}:${group_name}:/etc/opendkim/keys/${domain_global}/${group_name}.private" >> /etc/opendkim/KeyTable

echo ______________________________________________________________________________________

echo 'Update signingtable file'
echo *@${domain_global} ${group_name}._domainkey.${domain_global} >> /etc/opendkim/SigningTable

echo ______________________________________________________________________________________

echo 'Update trustedhosts'
echo ${domain_global} >> /etc/opendkim/TrustedHosts

echo ______________________________________________________________________________________

echo Configure OpenDKIM
cat > /etc/opendkim.conf  <<EOF
PidFile	/var/run/opendkim/opendkim.pid
Mode	sv
Syslog	yes
SyslogSuccess	yes
LogWhy	yes
UserID	opendkim:opendkim
Socket	inet:8891@localhost
Umask	002
SendReports	yes
SoftwareHeader	yes
Canonicalization	relaxed/relaxed
Selector	default
MinimumKeyBits	1024
KeyTable	refile:/etc/opendkim/KeyTable
SigningTable	refile:/etc/opendkim/SigningTable
ExternalIgnoreList	refile:/etc/opendkim/TrustedHosts
InternalHosts	refile:/etc/opendkim/TrustedHosts
OversignHeaders	From
#smpt_auth
smtpd_sasl_auth_enable = yes
smtpd_sasl_local_domain = $myhostname
smtpd_recipient_restrictions =
    permit_mynetworks
    permit_sasl_authenticated
    reject_unauth_destination
message_size_limit = 10485760
disable_vrfy_command = yes
## smtp_helo_name
smtp_helo_name = $myhostname.$mydomain
allow_min_user = yes
# Config DKIM
smtpd_milters = inet:localhost:8891
non_smtpd_milters = inet:localhost:8891
milter_default_action = accept
EOF

echo ______________________________________________________________________________________

echo 'Configure postfix '
postconf -e milter_default_action = accept
postconf -e smtpd_milters = inet:localhost:8891
postconf -e non_smtpd_milters = inet:localhost:8891
Chúc bạn thành công!
